


How to Tag an Article When Generating It
Tag an article while generating it in AmICited so you can organize and filter it in your Articles library.

A quick habit that pays off later: tag each article as you create it. Tags let you filter your Articles library by campaign, theme, status or whatever grouping helps your team.
Quick Steps
- At step 5 of the Generate an article flow, pick a workspace tag (or leave it as No tag if you’re just experimenting).
- Tag toward how you’ll want to find the article later, by campaign, status, or theme.
- Filter the Articles library later using the All tags dropdown to pull up everything with a given tag.
- Keep the tag set small and reused, rather than creating a new near-duplicate tag for every article.
- Revisit status tags periodically so they still reflect where each article actually is.
What is content tagging, and why does it matter for GEO?
A tag is a short, reusable label attached to a piece of content that describes what it’s for: a campaign, a topic, a stage of the funnel, a status like “draft” or “published.” On its own, a single tag looks trivial. Applied consistently across a content library, tags become a lightweight taxonomy: a way of organizing everything you’ve written so it can be filtered, grouped, and audited without anyone having to re-read every article to remember what it covers.
That organizational layer matters more in generative engine optimization (GEO) than it did in traditional content marketing, because winning AI citations is a volume game played against a moving target. A brand competing for visibility across dozens or hundreds of tracked prompts doesn’t publish one article and stop: it produces a steady stream of comparison pages, how-to guides, and listicles, each aimed at a different cluster of questions people ask ChatGPT, Perplexity, Gemini, or Google AI Overviews. Without a way to group that output, it becomes genuinely difficult to answer basic operational questions: which articles belong to this quarter’s campaign, which ones are still ideas versus published pages, which topic cluster is over-covered and which is thin. Tags are the answer to those questions.
This is also where tagging overlaps with AI content governance : the policies and processes a team uses to keep AI-generated content consistent, on-brand, and non-redundant as output scales. A handful of articles can be managed by memory; fifty or a hundred cannot. Tags are the simplest governance mechanism available: they don’t require a separate project management tool, they don’t force a rigid folder structure, and they scale with the workspace rather than against it. The moment a team stops tagging is usually the moment a library starts accumulating quiet duplication: two articles chasing the same prompt cluster from slightly different angles, published months apart because nobody could easily check what already existed.
Tags also map naturally onto how GEO content actually gets planned. Most teams organize their pipeline around a topic cluster model , grouping related prompts and articles under a shared theme so that authority builds in one area rather than spreading thin across unrelated ones, or around funnel stage, or around campaign. Whichever structure a team uses, tags are the field that carries that structure through the Articles library, turning a flat list of drafts into something that can be sliced and reasoned about the way the content plan was actually built.
Where to find it
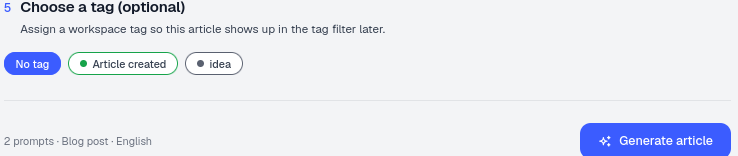
It’s step 5 (optional) of the Generate an article flow: “Choose a tag. Assign a workspace tag so this article shows up in the tag filter later.” Pick from your existing workspace tags (for example No tag, Article created, idea). Because tags are workspace-wide rather than tied to a single article, the list you see here is shared across everyone working in that workspace. A tag created for one article is immediately available to apply to the next, which is what keeps the taxonomy consistent as different team members generate content.
This step sits right after Custom instructions and before you generate the draft, which means tagging is a decision you make at creation time rather than a chore you circle back to later. That matters in practice: tagging retroactively across a large library is tedious and easy to skip, while tagging as part of the generation flow costs a few seconds and almost always gets done.
What it’s for
- Filter the library. The Articles library has an All tags filter: tags are what make it useful once you have dozens of drafts. Instead of scrolling a growing grid looking for one piece, you narrow straight to the relevant subset.
- Group by workflow. Tag by status (idea → drafted → published) or by campaign so everyone can find the right set. This is especially useful when content generation is a team effort, since a shared status tag means anyone can see at a glance what’s still in progress versus what’s ready to ship.
- Stay consistent with prompts. Tags are workspace-wide, so the same labels can organize prompts and articles alike. That consistency is what lets you connect the two halves of the workflow: a tag that groups a cluster of tracked prompts by theme can carry straight through to the articles written to target them, so the taxonomy you use for measurement and the taxonomy you use for content production are the same one.
- Support an audit trail. As a library grows, tags become a lightweight record of intent (why an article exists, which initiative it belongs to, what stage it’s at) without requiring a separate spreadsheet or project tracker alongside AmICited.
How to use it
- Pick a tag that reflects how you’ll want to find this article later. Think about the question you’ll be asking a few weeks from now, “show me everything from this campaign” or “show me everything still in draft”, and tag toward that future filter rather than toward how the article feels right now.
- Leave it as No tag if you’re just experimenting, you can always tag it afterward. Tagging is optional at generation time precisely so it doesn’t slow down quick tests or one-off drafts.
- Filter later from the Articles library’s All tags dropdown to pull up everything with a given tag. Combined with the library’s type filter, this lets you isolate something specific, for example every Comparison article tagged to one campaign, in a couple of clicks.
- Keep the tag set small. A handful of well-defined tags, reused consistently, beats a long tail of near-duplicate labels (“Q1 launch,” “Q1-launch,” “launch-q1”) that fragment the same content into three invisible buckets. If you find yourself creating a new tag for almost every article, it’s worth pausing to agree on a shared vocabulary with the rest of the team.
- Revisit stale tags periodically. Status tags in particular (“idea,” “drafted”) are only useful if they’re updated as an article moves through its lifecycle: an article still tagged “idea” six months after publication defeats the purpose of the filter.
It’s optional, but a minute of tagging now saves a lot of scrolling once your content library grows. The real payoff shows up downstream: once dozens of tagged articles are live, tags become the fastest way to check your coverage against the prompt clusters you’re actually trying to win, and to spot where your publishing pace, your content velocity , is falling behind a topic that needs more attention.
Where tagging fits in your broader content workflow
Tagging is a small step, but it’s the connective tissue between individual articles and the content operation as a whole. A single generated piece is judged on whether it earns a citation for the prompts it targets; a tagged library is judged on whether the whole body of work is coherent, non-redundant, and aimed at real gaps in your AI visibility . The first is a writing problem. The second is an organizational one, and tags are the cheapest tool available for solving it inside AmICited.
That organizational discipline compounds as your content plan matures. If you’re building your pipeline around a recurring publishing schedule, a consistent tag set makes it far easier to run something like a GEO-first content calendar , where campaigns, funnel stages, and topic clusters all need to stay legible across weeks or months of output. It’s just as useful upstream: before generating a new batch of articles, running a content gap analysis tells you which prompt clusters are worth prioritizing, and tagging the resulting articles by that same cluster name means you can later confirm, at a glance, that the gap actually got closed rather than partially addressed. And once an article is published, tagging is what makes it easy to find again when it’s time to check whether the piece still holds up structurally: whether it needs a refresh to keep it easy for AI models to parse and quote, per the guidance on how to structure content for AI citation .
Agencies and teams managing content across multiple brands or client domains get an even bigger return on this habit. A consistent tagging convention is what keeps one client’s campaign content distinguishable from another’s inside the same workspace model, the same way AmICited’s agency solution keeps separate domains cleanly organized rather than blended into one undifferentiated pile. Treat tagging as part of the generation step rather than an afterthought, and the Articles library stops being a list of drafts and starts being what it’s meant to be: a searchable record of exactly how your content maps to your AI share of voice goals, one label at a time.
Frequently asked questions
Tags are short, reusable labels you attach to an article so you can filter, group, and audit your Articles library later without re-reading every piece. They're workspace-wide, so the same tags can organize both prompts and articles, letting a campaign or theme carry consistently across your whole content pipeline.
Tagging is step 5 of the Generate an article flow, right after Custom instructions and before the draft is generated. Because it happens at creation time rather than afterward, it costs a few seconds and almost always gets done, unlike retroactive tagging across a large library, which is tedious and easy to skip.
Yes. Tagging is optional at generation time specifically so it doesn't slow down quick tests or one-off drafts; you can leave an article as No tag and apply one later. Still, tagging as you generate is the habit worth building, since it's far easier to do in the moment than to catch up on later.
Keep the set small and reused rather than creating a near-duplicate tag for every article. A handful of well-defined tags applied consistently is far more useful for filtering than a long tail of one-off labels like "Q1 launch," "Q1-launch," and "launch-q1" that fragment the same content into separate invisible buckets.
More tutorials in this section
 How to Choose Prompts to Target
Choose tracked prompts for an AI-generated article in AmICited to focus its topic and citation goals.
Read guide →
How to Choose Prompts to Target
Choose tracked prompts for an AI-generated article in AmICited to focus its topic and citation goals.
Read guide →
 What Content Types Can You Generate?
Explore AmICited content types, from blog posts and FAQs to landing pages, comparisons, glossaries and …
Read guide →
What Content Types Can You Generate?
Explore AmICited content types, from blog posts and FAQs to landing pages, comparisons, glossaries and …
Read guide →
 How to Use the Article Editor
Tour the AmICited Article Editor, including its writing canvas, formatting tools, GEO score, outline and …
Read guide →
How to Use the Article Editor
Tour the AmICited Article Editor, including its writing canvas, formatting tools, GEO score, outline and …
Read guide →Ready to put it into practice?
Free check · 7-day trial · card required